Witajcie przyjaciele !
Nawet przy starannym przygotowaniu do Bożego Narodzenia możesz przegapić pudełko lub torbę. Jeśli masz co najmniej dwa papiery ze świetnego Lexi Design i kilka tekturek - Boże Narodzenie zostanie uratowane! Ponadto na pewno masz już w domu klej, wycinki z papieru lub drobne ozdoby :-). Dziś przedstawiam wam tutorial ze zdjęciem jak zrobić prostą torebkę na prezent świąteczny. Ozdobiłam go papierem z kolekcji Winter Tales. Ta kolekcja jest na tyle niesamowita, że wystarczyło dołożyć do dekoracji kilka tekturek.
Hello friends !
Even with careful preparations for Christmas, you may be short on a gift box or bag. If you have at least two papers from the great Lexi Design and some chipboards - Christmas will be saved! Besides, I'm sure you already have glue, paper clippings, or small decorations at home. :-)) Today, I bring you a photo tutorial on how to make a simple Christmas gift bag. I decorated it with paper from the Winter Tales collection. This collection is so amazing that I needed to add only a few chipboards to the decoration.
Na podstawę torby użyłam papierów jednokolorowych (300g), który wyciąłam i zbigowałam zgodnie z załączonym rysunkiem, oraz przygotowałam papiery projektowe.
I used monochrome paper (300g) for the base of the bag, which I cut out and scored according the technical layout and I prepared cut-outs of design paper.
1. Najpierw złożyłam długi pasek białego papieru (spód torby) i skleiłam go razem z brązowymi bokami torby.
1. First, I folded a long strip of white paper (bottom of the bag) and glued them together with the brown sides of the bag.
2. Następnie złożyłam oba mniejsze białe kartki, wyciąłam je (zgodnie ze zdjęciem poniżej) i przykleiłam do przedniej i tylnej części torby.
2. Then I folded both smaller white papers, cut them out (according to the photo below) and glued them to the front and back of the bag.
3. Delikatnie zgiąłam cienkie paski papieru w palcach i przykleiłam je do podstawy torby. Dlatego podstawa torby na prezent została wykonana. Sama torba ma wymiary 29,7 cm x 19 cm x 7 cm. O tak, część klejąca nie wygląda dobrze na zdjęciu. Bez stresu, jeśli coś takiego Ci się przydarzy, w następnym kroku przykryję to papierem projektowym.
3. I gently bent the thin strips of paper in my fingers and glued them to the base of the bag. Therefore, the base of the gift bag was done. The bag itself measures 29.7 cm x 19 cm x 7 cm. Oh yes, the gluing part does not look good in the photo. No stress, if something like this happens to you, the next step will be covered by design paper.
5. Do spodu przykleiłam ostatni pasek brązowego papieru.
5. I glued last strip of brown paper to the bottom.
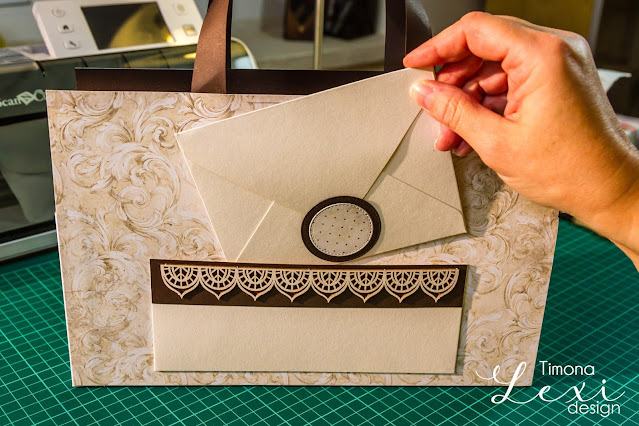
6. Do ozdobienia torby przygotowałam małą kieszonkę z brzegiem z tekturki, kopertę i oraz tekturkę-shaker, którą wypełniłam koralikami.
6. To decorate the bag I prepared a small pocket with a chipboard border, an envelope and a shaker chipboard, which I filled with beads.
Gotowe.
Done.
Pozostaje tylko włożyć prezent do torby i święta są uratowane.
The only thing left is to put a gift in to the bag and Christmas is saved.
Użyłam: / I used:
Miłych twórczych dni!
Have a nice creative days!


Brak komentarzy:
Prześlij komentarz