
Witajcie!
Jeśli kiedykolwiek zastanawialiście się, czy samodzielne wykonanie albumu na kółkach jest trudne i jak się do tego zabrać, nasza edukatorka Ania cytrynowe drzewo przekona Was, jak przyjemny jest to proces. Ania przygotowała dla Was kurs na mini album krok po kroku. Do albumu wykonała także kartkę i opowie Wam także, jak i ją wykonać. Album jest w formacie 15 x 15 cm, ma 4 karty, a łączenie poszczególnych kart jest zrobione za pomocą metalowych kółeczek na górze albumu.
Hello Friends!
If you've ever wondered whether making a wheelie album yourself is difficult and how to go about it, our educator Ania cytrynowe drzewo will convince you how enjoyable the process is. Ania has prepared a step-by-step course for you on how to make a mini album. She has also made a card for the album and will tell you how to make it too. The size of the album is 15 x 15 cm, it has 4 cards and the connection between the cards is made by means of metal rings on the top of the album

Krok 1
Zaczynamy od przygotowania bazy na album. Musimy wyciąć kółka dziurkaczem, aby następnie spiąć poszczególne karty albumu. Możecie użyć ręcznie zrobionego pomocnika w postaci kartki z przygotowanymi dziurkami – potrzebujecie kawałek papieru (najlepiej sztywnego o gramaturze min. 200-250) przyciętego do tego samego formatu jak album (tutaj 15 cm), zwykły biurowy dziurkacz, linijkę i ołówek. Wyznaczacie środek i staracie się symetrycznie przedziurkować kartkę dziurkaczem. Możecie to też zrobić w drugą stronę, tzn. najpierw dziurkujecie, a później przycinacie na równo z każdej strony do wymiaru 15 cm. Jak już mamy przygotowany kartonik-pomocnik to dziurkujemy wszystkie 4 karty albumu.
Step 1
We start by preparing the base for the album. You need to cut out circles with a hole punch so that you can fasten the individual pages together. You can use a handmade card with pre-punched holes - you need a piece of paper (preferably a stiff one with a minimum weight of 200-250) cut to the same format as the album (here 15 cm), a regular office punch, a ruler and a pencil. Mark out the centre and try to punch symmetrically through the card with the hole punch. You can also do it the other way round, i.e. you punch first and then cut the card to 15 cm on each side. Once you have the cardboard box ready, punch all 4 cards of the album.


Krok 2
Teraz każdą kartę musimy z dwóch stron okleić papierem. Ania to robi w ten sposób, że nakłada klej na beermatę i przykłada do papieru. Następnie odcina nożykiem nadmiar papieru i dociska papier kością. Po przyklejeniu papieru z jednej strony beermaty pamiętajcie o wycięciu dziurek dziurkaczem. Drugą stronę beermaty oklejacie tak samo jak pierwszą – klej na beermatę, przykładacie papier, odcinacie nadmiar, wycinacie dziurki.
Step 2
Now each card has to be covered on both sides with paper. Ania applies glue to the beermatta and presses it onto the paper. Then she cuts off the excess paper with a knife and presses the paper down with a bone. After gluing the paper on one side of the beermat, remember to cut holes with a hole punch. Glue the other side of the beermata in the same way as the first one - glue on the beermata, place the paper, cut off the excess and punch holes.


Krok 3
Każdą krawędź oklejonej karty albumu przyciemnijcie tuszem. Możecie wykorzystać do tego kuchenną gąbkę i tusz wodny. Tuszujcie w kierunku „na zewnątrz”.
Step 3
Darken each edge of the covered scrapbook page with ink. You can use a kitchen sponge and water-based ink. Ink in the "outwards" direction.


Krok 4
Teraz należy wybrać strony albumu, które będą okładkami. Dziurki, które zrobiliśmy dziurkaczem – na okładkach dodatkowo zabezpieczamy nitami używając do tego tzw. „krokodylka”.
Step 4
Now select the pages of the album which will be the covers. Secure the holes you made with the hole punch on the cover with rivets.


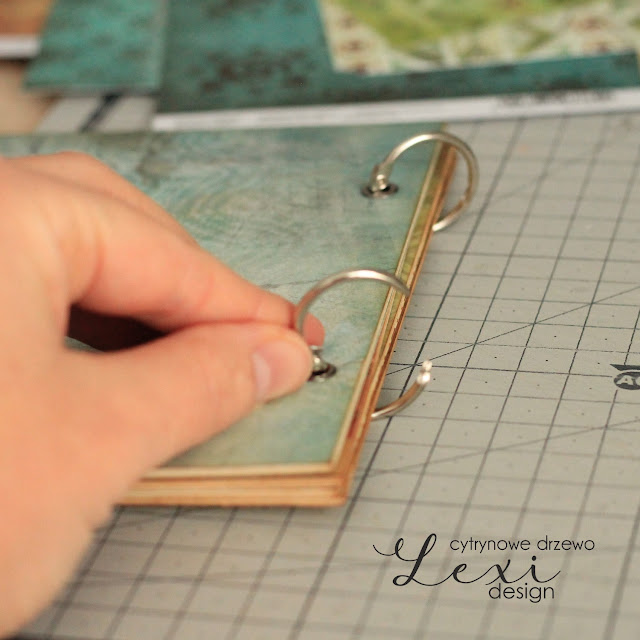
Krok 5
Następnie należy spiąć album metalowymi kółkami. Tutaj wystarczą takie o średnicy 2cm.
Step 5
Then fasten the album together with metal rings. Here a 2 cm diameter is sufficient.

Krok 6
Czas na ozdabianie albumu w środku. Po pierwsze należy przygotować maty na zdjęcia. Album z uwagi na swój rozmiar (15 x 15 cm) dostosowany będzie do formatu zdjęć 9 x 13 (dokładnie takie zdjęcia są w formacie 8,9 x 12,7 cm) – tak więc każda mata na zdjęcie powinna być przycięta do formatu 9,7 x 13,5 cm. Po wklejeniu zdjęcia będzie wystawała ładna ramka. Ania zwróciła uwagę, aby papiery, których użyła na maty, były takie same jak na stronie obok. Każdą matę także potraktowała tuszem.
Step 6
Time to decorate the album inside. First of all you need to prepare the photo mats. The album, because of its size (15 x 15 cm) will be adapted to the 9 x 13 photo format (exactly these photos are 8,9 x 12,7 cm) - so each photo mat should be cut to 9,7 x 13,5 cm. When the photo is pasted in, a nice frame will stick out. Anne made sure that the papers she used for the mats were the same as on the page opposite. She also treated each mat with ink.


Krok 7
Do ozdobienia poszczególnych kart albumu Ania użyła wycięte wcześniej maty, tekturki, które również potuszowała, washi tape, a także skrawki papieru scrapowego z tej samej kolekcji, z której wykonany jest album. Ponadto wycięła kilka wydrukowanych napisów. Poniżej przedstawiono Wam każdą stronę albumu z opisem.
Step 7
To decorate the individual pages of the album Ania used the mats she had cut out, chipboards from Laserowe Love which she also inked, washi tape and scraps of scrapbook paper from the same collection as the album. She also cut out some printed inscriptions. Below you can see each page of the album with a description.
Strona 1
Na papier bazowy naklejono matę, ale pod nią uprzednio naklejono kilka kawałków washi tape i porwanego papieru z kolekcji. Dodatkowo washi tape także na matę i wydrukowane napisy.
Page 1
A mat was glued onto the base paper, but underneath it several pieces of washi tape and torn paper from the collection were glued on beforehand. In addition, washi tape also on the mat and printed lettering.

Strona 2
Pod matę również naklejono washi tape i kawałek papieru z kolekcji, a na matę naklejono ozdobną tekturkę. Tekturka wklejona jest w taki sposób, że bez problemu da się pod nią wsunąć zdjęcie.
Page 2
Under the mat was also glued washi tape and a piece of paper from the collection, and on the mat was glued decorative cardboard. The cardboard is glued in such a way that you can easily put a photo under it.

Strona 3
Tutaj również wykorzystano washi tape oraz ozdobne tekturki – kaczuszka także wklejona jest w taki sposób, że nie będzie problemu włożyć pod nią fotkę.
Page 3
Here, too, washi tape and decorative cardboard were used - the duck is also glued in such a way that it will be no problem to put a photo under it.

Strona 4
Tym razem wykorzystano ponownie washi tape oraz skrawek papieru z kolekcji, a także ozdobny tekturkowy napis.
Page 4
This time, washi tape and a scrap of paper from the collection were used again, along with decorative chipboard lettering.

Strona 5
Pod matę naklejono dwa rodzaje washi tape, a nad matą tekturkowe chmurki.
Page 5
Two types of washi tape were taped under the mat and chipboard clouds were taped over the mat.

Strona 6
To już ostatnia strona albumu. Tutaj również przyklejono matę – tym razem w pionie. Ponadto w kilku miejscach dodano washi tape, wydrukowany i przycięty napis, a także tekturkę.
Page 6
This is the last page of the album. Here also the mat was glued - this time vertically. Also washi tape, printed and cut lettering and chipboard was added in several places.

Krok 8
Czas na ozdobienie okładki. Wykorzystano do tego misia wyciętego wykrojnikiem z papieru kraft (spokojnie, jeśli nie macie wykrojnika to bez problemu wytniecie takiego od ręki, albo możecie zastąpić innym dziecięcym motywem). Ania od razu wycięła dwa misie, ponieważ drugiego zaplanowała umieścić na kartce gratulacyjnej. Oprócz misia na okładce znalazły się także 3 prostokąty (2 wycięte z kolekcji, jeden z białego papieru), oraz koło i kółka z falbanką. Wymiary żółtej karteczki są w wymiarach ok. 13,5 x 12,3 cm. Pozostałe są o ok. 0,5 cm krótsze. Następnie naklejono na siebie wszystkie karty, dodałano kilka washi tape. Kółeczko naklejono na kółka z falbanką, a na to misia. Falbankę podklejono nieco wyżej używając do tego kawałków beermaty.
Step 8
Time to decorate the cover. We used a teddy bear cut out of kraft paper (don't worry, if you don't have a die cutter you can easily cut one out by hand or you can replace it with another child's motif). Ania cut out two bears at once, because she planned to put the second one on the congratulation card. In addition to the teddy bear on the cover there are also 3 rectangles (2 cut from the collection, one from white paper), and a circle and circles with a frill. The dimensions of the yellow card is about 13,5 x 12,3 cm. The others are about 0.5 cm shorter. Then all the cards were glued on top of each other, some washi tape was added. The circle was glued over the circles with the frill, and the teddy bear was glued over that. The frill was glued a little higher using pieces of beermat.


Na drugą falbankę naklejono napis, a pod spodem naklejono drugą taką samą falbankę. Ponieważ napis ten nie jest naklejony na okładce tylko przymocowany jest wstążeczką do kółka albumu, Ani zależało, żeby z dwóch stron był ten sam papier. Na koniec razem z napisem dodano kilka wstążeczek i sznurek zawiązane w kokardki na każdym z kółeczek.
An inscription was glued on the second frill and the same frill was glued underneath. Ania wanted to have the same paper on both sides as the inscription was not glued on the cover but attached to the album's ring with a ribbon. Finally, along with the inscription, a few ribbons and string were added, tied in bows on each circle.

Krok 9
Czas na kartkę. Ania zrobiła ją na bazie A5 zgiętej na pół, więc pole robocze to format ok. A6. Kartka współgra z okładką albumu, więc są one do siebie bardzo podobne. Mamy 3 warstwy papieru, washi tape, kółka z falbanką naklejone nieco wyżej dzięki beermacie, kółko pod misiem i misia. Napis także przytrzymywany jest na sznureczku/wstążeczce jak w albumie. Środek kartki nie jest ozdobiony, zawiera tylko życzenia.
Step 9
Time for the card. Ania made it on A5 base folded in half, so the working area is about A6 format. The card coordinates with the album cover so they are very similar. We have 3 layers of paper, washi tape, circles with a frill glued a little higher thanks to beermat, circle under the teddy bear and teddy bear. The lettering is also held on a string/ ribbon like in an album. The center of the card is not decorated, contains only the wishes.

Album i kartka autorstwa Ani cytrynowe drzewo pokazały, papiery Colors of Africa od Lexi Design nadają się także do dziecięcych projektów. Album Bartusia i kartka wyszły bardzo pozytywne i urokliwe. Znacie kolekcję Colors of Africa? Do jakiego typu prac najbardziej według Was pasuje? Pracowaliście z nią? Chętnie obejrzymy efekty pracy - zapraszamy do odwiedzenia naszej grupy na fb - Lexi Inspirations
The album and card by Ania cytrynowe drzewo showed, Colors of Africa papers from Lexi Design are also suitable for children's projects. Bartu's album and card came out very positive and adorable. Do you know the Colors of Africa collection? For what type of work, in your opinion, fits best? Have you worked with it? We would love to see the results of your work - please visit our group on fb - Lexi Inspirations


Produkty, których użyła Ania:

- tekturki od Laserowe Love
- 4 x beermata w wymiarach 15 x 15 cm
- washitapy
- wstążeczki i sznureczki
- biały papier na bazę kartki, do wydruku napisów oraz pod wykroje
- 4 srebrne nity
- 2 kółka do spięcia albumu (średnica 2 cm)
- wykrojniki miś, koła z falbanką, koła z przeszyciami
Products used by Ania:
- decorative chipboards from Laserowe Love
- 4 x beermata in size 15 x 15 cm
- washitap
- ribbons and strings
- white paper for the base of the card, for printing the inscriptions and for the die-cuts
- 4 silver rivets
- 2 rings to fasten the album (diameter 2 cm)
- die-cuts teddy bear, circle with frill, circle with stitching
Brak komentarzy:
Prześlij komentarz