
Witajcie!
Przyjęło się, że pierwsze urodziny dziecka są szczególnie celebrowane. Z pewnością zrobicie wrażenie, jeśli przygotujcie album, który ozdobią zdjęcia z pierwszego roku życia malucha.
Nasza edukatorka Ania cytrynowe drzewo przygotowała dla Was kurs na taki album krok po kroku. Album powstał na bazie Pierwszy Roczek z Laserowe Love o wymiarach 25 x 25 cm oraz z papierów do scrapbookingu z kolekcji Lexi Design Sweet Baby Boy oraz Sweet Baby Boy Set. Jedna strona to jeden miesiąc, ale że stron w bazie mamy o 2 więcej, Ania poświęciła jedną stronę na zdjęcia „Jeszcze u mamy w brzuszku”, a drugą na czas zaraz po narodzinach, gdzie umieścimy także niewielką metryczkę.
Hello Friends!
A child's first birthday is particularly celebrated. You will certainly make an impression if you prepare an album, which will be decorated with photos from the first year of baby's life.

KROK 1 – OKLEJENIE ALBUMOWEJ BAZY
Zacznijcie od nałożenia kleju na całą powierzchnię pierwszej karty, następnie przyklejcie papier w taki sposób, aby przylegał do dwóch krawędzi.


Kolejno odwróćcie stronę i dotnijcie nożykiem papier. Delikatnie zaokrąglone rogi bazy dotnijcie nożyczkami. Dziurkaczem zróbcie dziurki. Proces ten należy powtórzyć na wszystkich albumowych stronach. Na kartach, w których z uwagi na chmurki lub litery nie było dostępu do zaokrąglenia rogów nożyczkami po przyklejeniu papieru – Ania robiła to przed jego naklejeniem.
Then turn the page over and trim the paper with a citter. Use scissors to trim the gently rounded corners of the base. Make holes with a hole punch. This process should be repeated on all album pages. On cards where, because of the clouds or letters, there was no access to round the corners with scissors after gluing the paper - Anne did this before gluing.


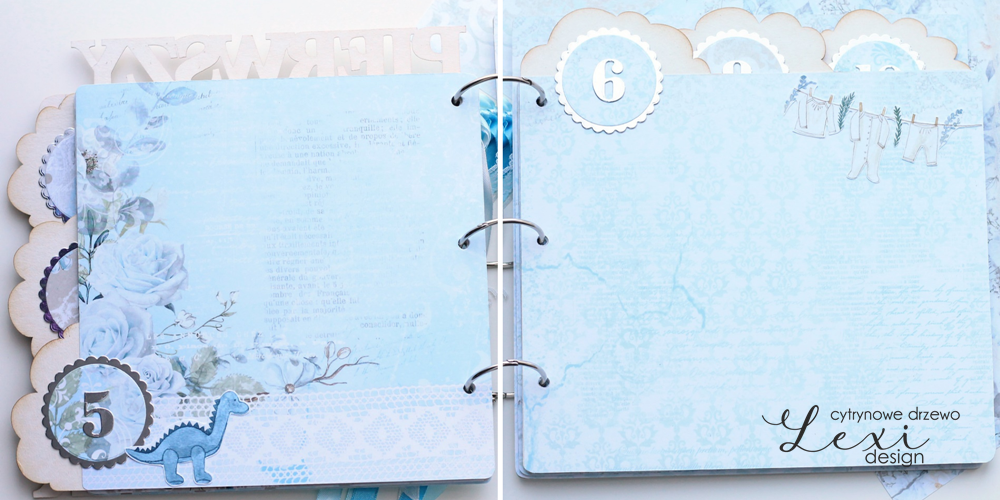
KROK 2 – CYFERKI
W kolekcji papierów Sweet Baby Boy macie także dostępne paski, gdzie występują cyferki, które możecie wyciąć i użyć do ozdobienia albumu. Ania w tym przypadku zdecydowała się jednak na cyferki srebrne, które wycięła przy pomocy wykrojników – tak samo jak falbanki.
STEP 2 - NUMBERS

Oprócz cyferek i falbanek Ania wycięła też kółka (z tego samego papieru, z którego ozdobiona dana karta albumu). Następnie wszystkie wycięte elementy na siebie nakleiła.
Apart from numbers and frills Ania also cut out circles (from the same paper used to decorate the album card). Then she glued all the cut out elements on each other.

Do kart albumu Ania przykleiła je w miejsce chmurek. Przygotowała też w programie napisy do druku, które następnie wycięła i przykleiła na pierwszą i drugą stronę albumu.
For the album pages Ania glued them in place of the clouds. She also prepared the inscriptions to be printed in the program, which she cut out and glued to the first and second page of the album.


KROK 3 – OZDABIANIE ALBUMU
Do ozdobienia albumu Ania wykorzystała elementy do wycinania z kolekcji Sweet Baby Boy SET. Na każdej stronie, najczęściej przy cyferce, nakleiła wyciętą grafikę.


Ania wydrukowała i wycięła także metryczkę, którą dodatkowo po potuszowaniu tuszem Distress nakleiła na drugą stronę albumu.
Ania also printed and cut out a birth certificate which she glued to the other side of the album after inking it with Distress ink.


Następnym krokiem było potuszowanie krawędzi całego albumu – tzn. literek z okładki i chmurek.
The next step was to ink the edges of the entire album - that is, the cover letters and clouds.


KROK 4 – OZDABIANIE OKŁADKI
Do ozdobienia okładki Ania wykorzystała między innymi falbankę wyciętą w srebrnym lustrzanym papierze, wycięte koło z papieru z kolekcji, grafikę wyciętą z SETa, koronki, tekturki, gwiazdki.
STEP 4 - DECORATING THE COVER

Na początku przyklejcie koronki pod kawałek papieru z kolekcji, następnie naklejcie nieco inną koronkę już na ten papier. Następnie przyklejcie kawałki beermaty, a na nie - falbankę i kółko. Kompozycja zyska dzięki temu przestrzenność.
First, glue the lace under a piece of paper from the collection, then glue a slightly different lace already on that paper. Then glue some beermatics and on them - the frill and the circle. This will make the composition look spacious.


Następnie przyklejcie grafikę – ale również podklejając pod nią beermatę.
Next, glue the graphic on - but also glue the beermatta underneath it.


Dodajcie kilka samoprzylepnych małych gwiazdek oraz tekturowe motylki i chmurki.
Add some self-adhesive small stars and chipboard butterflies and clouds.


KROK 5 – SPINANIE ALBUMU
Do spięcia albumu Ania użyła trzech metalowych kółek o średnicy 4 cm. Kółko znajdujące się najwyżej ozdobiła wstążkami i koronkami.
Album gotowy!
To fasten the album Ania used three metal circles with diameter of 4 cm. The highest circle was decorated with ribbons and lace.
Album is ready!


Ania użyła / Ania used:


- baza Pierwszy Roczek Laserowe Love:
https://www.laserowelove.pl/pl/p/Baza-albumu-Pierwszy-Roczek-25x25-Emma-Billy/2197
- tekturki Baby Boom Laserowe Love: https://www.laserowelove.pl/pl/p/Akcesoria-dla-dziecka-Tekturka-Baby-Boom/4215
- srebrny papier lustrzany
- wstążki, koronki
- klej
- nożyk, nożyczki
- dziurkacz biurowy
Brak komentarzy:
Prześlij komentarz